Revolutionize Your Network with Azure Virtual Network TAP(Terminal Access Point) : Unleash Next-Level Control!
In a world where every byte of data could mean the difference between triumph and breach, mastering your network traffic is your ultimate superpower. Azure Virtual Network TAP (Terminal Access Point) is your ticket to unparalleled visibility, delivering real-time insights into your virtual networks without a hint of performance lag. From crushing security threats to turbocharging performance and nailing compliance, this game-changing tool puts you in the driver’s seat of your cloud empire. Dive in and see why Virtual Network TAP is the secret weapon your business can’t afford to ignore!
Azure Virtual Network TAP: Key Features and Benefits
Purpose: Azure Virtual Network TAP is designed to send a copy of network traffic from a virtual machine to a designated destination, enabling analysis, security monitoring, or troubleshooting.
How It Works: A TAP resource is configured on a virtual network, redirecting traffic to a collector, which can be a virtual machine or a third-party solution (e.g., for network analysis).
Use Cases: Monitoring security threats, performance analysis, compliance checks, and diagnostics.
Benefits: No impact on network performance, seamless integration with analysis tools, and support for third-party solutions.
Components: Requires a TAP resource, a traffic destination (e.g., a virtual appliance), and an Azure virtual network.
Requirements
To use Azure Virtual Network TAP, you must:
- Be registered for the preview (check for a confirmation email).
- Have virtual machines in Azure, and everything (machines, TAP, and analysis tools) must be in the same region.
- Have an analysis tool ("partner solution") to receive the traffic—if you don’t have one, you need to get one.
- If you have multiple subscriptions or virtual networks, ensure they are linked and in the same region.
Essential Permissions for Azure Virtual Network TAP Configuration
To configure Azure Virtual Network TAP, your account must have the Network Contributor role or a custom role with the following permissions:
Microsoft.Network/virtualNetworkTaps/*: Allows creating, updating, reading, or deleting a Virtual Network TAP resource.
Microsoft.Network/networkInterfaces/read: Permits reading the network interface where the TAP is configured.
Microsoft.Network/tapConfigurations/*: Enables creating, updating, reading, or deleting TAP configurations on a network interface.
Public Preview Limitations
Here are the limitations during our preview phase:
Virtual Network TAP only supports a virtual machine’s (VM) network interface as a mirroring source.
Virtual Network TAP supports a Load Balancer or a VM’s network interface as the destination resource for mirrored traffic.
Virtual Network does not support Live Migration. A VM set as a source for Virtual Network TAP will have Live Migration disabled.
VMs behind a Standard Load Balancer with Floating IP enabled cannot be set as a mirroring source.
VMs behind a Basic Load Balancer cannot be set as a mirroring source.
Virtual Network does not support mirroring of inbound Private Link Service traffic.
VMs in a virtual network with encryption enabled cannot be set as a mirroring source.
Virtual Network TAP does not support IPv6.
When a VM is added or removed as a source, the VM might experience network downtime (up to 60 seconds).
Supported Regions
Asia East
US West Central
🔧 How to Configure Azure Virtual Network TAP: Step-by-Step Guide
1. Log in to the Azure Portal
-
Sign in at https://portal.azure.com using your Azure credentials.
-
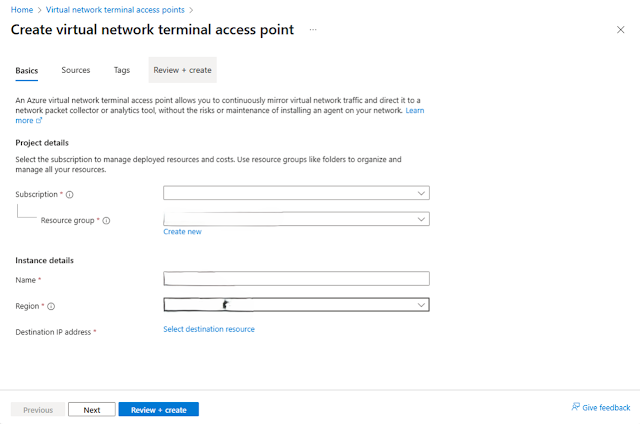
In the search bar, type "Virtual Network TAP" and select it from the results.
-
Choose the appropriate Subscription ID where you want to create the TAP resource.
-
Select an existing Resource Group or create a new one for the TAP resource.
-
Enter a unique and descriptive name for your Virtual Network TAP resource.
-
Choose the Azure Region where the TAP resource will be deployed.
⚠️ Important: The TAP, source VMs, and destination must all be in the same region.
7. Add a Destination Resource
-
Click "Select destination resource".
-
On the Add a destination page:
-
Choose either a Network Interface (NIC) or a Load Balancer.
-
Use the search bar to filter and locate your desired destination resource.
-
Select the resource and click "Select" to continue.
-
ℹ️ Note: A Virtual Network TAP resource supports only one destination resource, and it must be in the same region.
8. Add Source Network Interfaces
-
On the Add source network interfaces page:
-
Use the search bar to find the network interfaces (NICs) you want to mirror traffic from.
-
You can select multiple sources, but traffic from all will be mirrored to the same destination.
-
After selecting, click "Add".
9. Review and Create
-
Review your configuration settings.
-
Click "Review + Create".
-
Once validation passes, click "Create" to deploy your Virtual Network TAP resource.
.jpg)


Kommentarer
Skicka en kommentar