Lock Down Your Network: A Step-by-Step Guide to Azure DNS Security Policy

Protect your virtual networks from DNS-based threats with Azure's DNS Security Policy! This powerful tool lets you filter, log, and manage DNS traffic to safeguard your environment. Whether you're blocking malicious domains or monitoring traffic, this guide will walk you through the essentials of setting up a DNS Security Policy in Azure. Pair this with your screenshots to configure it like a pro!
What is a DNS Security Policy?
A DNS Security Policy in Azure allows you to control and secure DNS queries within a Virtual Network (VNet). It helps you:
Filter DNS queries: Allow, block, or alert on specific domains.
Log traffic: Store DNS query details for analysis.
Protect against attacks: Block access to known malicious domains.
Scale across networks: Apply a single policy to multiple VNets in the same Azure region.
This feature is a game-changer for securing DNS traffic, introduced to simplify and centralize DNS management compared to older methods like custom firewalls.
Key Components
Before diving in, understand the core elements:
Location: Policies only apply to VNets in the same Azure region (e.g., East US, Central US).
DNS Traffic Rules: Define actions (Allow, Block, Alert) based on domain lists and priorities (100–65,000, lower numbers = higher priority).
Virtual Network Links: Connect the policy to one or more VNets (1:N relationship).
DNS Domain Lists: Lists of domains (e.g., malware.contoso.com) used in rules. Wildcards (e.g., *.contoso.com) are supported.
Step-by-Step Setup Guide
Follow these steps to create and configure a DNS Security Policy in Azure.
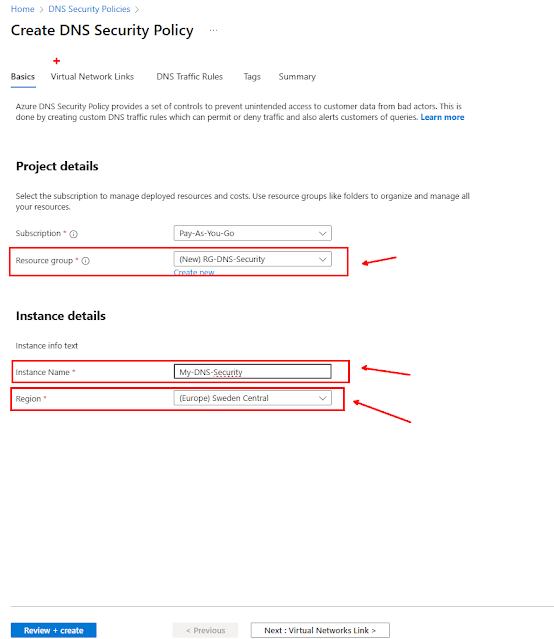
Step 1: Create a DNS Security Policy
Navigate to Azure Portal: Log in to portal.azure.com.
Search for DNS Security Policy: In the search bar, type "DNS Security Policies" and select it.
Create a New Policy:
Click Create DNS Security Policy.
Choose the Subscription and Resource Group.
Enter a Policy Name (e.g., myeast-secpol).
Select the Region (e.g., East US). Ensure it matches your VNet's region.

Step 2: Link to Virtual Networks
Access Virtual Network Links:
On the next page, click "Virtual Network Links".
Add a Link:
Click Add and select a VNet in the same region (e.g., myeastvnet-40).
Confirm and save.

Important: A VNet can only be linked to one DNS Security Policy at a time. To switch policies, remove the existing link first.
Step 3: Set Up DNS Traffic Rules
Access Traffic Rules:
In the DNS Security Policy create a rule
Create a Rule:
Click Add to create a new rule.
Set a Rule Name (e.g., block-malicious).
Assign a Priority (e.g., 100 for high priority).
Select an Action:
Allow: Permits and logs queries.
Block: Stops and logs queries.
Alert: Allows queries but logs an alert.
Select a Domain List (e.g., blocklist-1) if you already have one available. If not, create a new one as I’m doing now. If you have multiple domains, you can also import them using a CSV file.Enable or disable the rule as needed.

Save the rule.
Pro Tip: Rules process in priority order. If contoso.com is allowed in a rule with priority 100, but sub.contoso.com is blocked in a rule with priority 200, the allow rule takes precedence.

Step 5: Configure Logging (Optional)
Set Up Logging:
In the policy settings, configure logs to go to a storage account, Log Analytics workspace, or Event Hub.
Enable logging for allowed, blocked, or alerted queries.
Review Logs:
Use Azure Monitor or your chosen storage solution to analyze DNS traffic for suspicious activity.


Step 6: Test and Monitor
Test the Policy:
Trigger DNS queries to domains in your lists (e.g., Myweb.se.) from a resource in the linked VNet.
Verify the action (allow, block, or alert) is applied correctly.
Check Logs:
Review logs to ensure queries are logged as expected.
Adjust rules or domain lists if needed.
Best Practices
Use Specific Domains: Avoid overly broad wildcards (e.g., .) to prevent blocking essential Azure services.
Prioritize Rules Carefully: Lower priority numbers override higher ones.
Monitor Logs Regularly: Use logs to spot unusual DNS activity.
Test Changes: Always test rules in a non-production environment first.
Limitations
Regional Restriction: Policies only apply to VNets in the same region.
Single Policy per VNet: A VNet can only link to one policy.
Caps: Up to 1000 policies, 10 traffic rules per policy, and 100,000 domains across lists.
Why It Matters
Before DNS Security Policy, managing DNS traffic in Azure often required complex firewall rules or third-party tools. Now, you can centralize DNS security, protect against threats, and gain insights—all within the Azure ecosystem. With your screenshots, you’ll have a complete guide to secure your network like a pro!


Kommentarer
Skicka en kommentar